
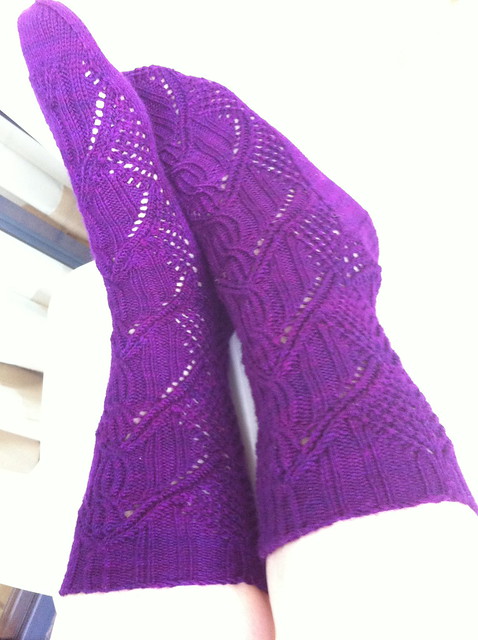
I finally finished my Aeolian Shawl, which I cast on over a year ago. This was a very slow going project due to the beading required. The process of placing the beads is time consuming itself, but I also had a few months where I could not obtain the beads at all, and of course motivation issues can sometimes raise their ugly head too! Frustratingly, the photos don’t even SHOW the beads, but TRUST ME they are there! This was knit in Knit Picks Gloss Lace in the Raisin colourway and I used 1.5 skeins (about 660m). I totally lost track of how many packets of beads I used - maybe about 5 packets of 6gms?
Apart from some other bits and pieces, I also knit these 2 gorgeous little rompers for a dear little baby that is due to makes its appearance next year. The mum isn’t keen to find out the sex of the bub, so I am left guessing what colours and styles of knitwear to make for her. I decided that I would make something teeny-tiny, which I understand realistically will only get worn once or twice, but who doesn’t love making teeny-tiny-baby clothes? I also made 2, which I hope covers the bases in terms of gender! I reckon the purple one could even be unisex! I must admit that I am one of those people who love pink for girls and will no doubt be thrilled to make something totally pink and frilly if it is indeed a girl, and after a run of 4 boys in the family, a little girl would be lovely! (Of course any baby will be loved equally, but I wanna make THIS!)
I wrote the pattern down as I went, due to the fact I wanted to make at least 2, so I am sharing this with you, but be warned that this has been neither test knit, OR actually tried on a baby! The blog is as good a place as any to actually store the information for myself anyway, so if anyone wants to give it a go, I’d love to hear if it actually fits a real baby!


Size 000 Top Down Seamless Romper
Needles: 4mm 40cm circular
4mm dpns or other small circumfrence knitting options
yarn: approx 150g of 8 ply yarn
gauge: 22 st per 10cm
28 rows per 10cm
abbreviations:
K - knit
P - purl
K2tog - knit 2 together
ssk - slip, slip, k2tog
p2togtbl - purl 2 together through back loop
LLI - left lifted increase
RLI - right lifted increase
slpm - slip marker
pm - place marker
c/o - cast on
dpn - double pointed needle
skills req: knit, purl, increase, decrease, grafting, short rows, picking up stitches.
SETUP FOR RAGLAN INCREASES
Cast on 40 stitches
1st row - p6 pm p6 pm p16 pm p6 pm p6
RAGLAN INCREASES
2nd row - * k to 1st st before marker RLI, k1, slpm, k1, LLI* repeat 3 times, k to end.
3rd row - purl to end
Repeat rows 2 and 3 until there are 20 st on each front, 44 on back and 34 on each sleeve.
DIVIDING FOR THE ARMS
Next row - k 20, remove marker, c/o 2 pm, c/o 2, slip 34 stitches for arm from left needle onto scrap yarn, remove marker and knit across back 44 stitches. Remove marker, c/o 2, pm, c/o 2, place arm stitches on scrap yarn, then knit across left front 20 stitches.
Work in stockinette til back measures 15cm from cast on edge.
MARKING ROOM FOR BIG BABY BUM
- WIDTH
Next row (RS) - knit to 1st marker, slpm, K1, LLI, knit to st before marker RLI, knit to end
Next row (WS) - purl
Repeat these 2 rows 2 more times (6 stitches increased over 6 rows)
Continue to work in stockinette until back is 20cm from c/o edge
-DEPTH
**K to first marker, slpm, knit to 6 stitches before 2nd marker, wrap and turn
P to 6 stitches before marker, wrap and turn
K to end picking up and working wrap as encountered
P to end picking up and working wrap as encountered
Work 4 rows in stockinette*
Repeat once from **
WORKING LENGTH
Continue to work in stockinette until front measures 24cm
JOINING TO WORK IN THE ROUND
All rows will now be knit - no more purling! We are now joining to work in the round. If you aren't using the 40cm circular, you will need to switch to that now.
Next row - K to end, slipping markers as encountered. Place new marker; this will be the start of round marker. Next round - c/o 6, pm, join to knit in the round. K to side marker (side markers can now be removed when encountered) K24, pm, K6, pm, K24 to next marker and remove. K to end of round.
There are now 4 markers in place - 2 in the front and 2 in the back. These are the markers that will be used for working the gusset.
Work in the round for 2cm, slipping markers when encountered and finishing at the beginning of round marker (first front gusset marker)
GUSSET INCREASES
Row 1 - slpm, RLI, K to next marker, LLI, slpm, K to next marker, slpm, RLI, K to next marker, LLI, slpm, K to end of round
Row 2 - K to end
Repeat these 2 rows until there are 14 stitches between the gusset markers at front and back, ending with row 2 at the beginning of round marker.
GUSSET GRAFTING
Slip the next 14 gusset stitches onto a dpn (removing markers). The following 46 stitches will form the left leg. Slip these stitches onto a 2nd circular or scrap yarn.
Slip the next 14 gusset stiches onto a 2nd dpn. The remaining 46 stitches will be worked in the round for the right leg.
Graft the 2 sets of 14 stitches together
WORKING THE LEGS
You will need to use your preferred method of small circumference knitting (dpns, magic loop etc).
Join in yarn at beginning of left leg. K 46 stiches, pick up 1 stitch along gusset, pm, pick up 1 stitch along gusset and begin working in the round for 3 rows ending at centre leg marker.
Next row - K1, K2TOG, K to 3 stitches before marker, SSK, K1.
Next row - K
Next row - K
Repeat these 3 rows until leg 28 stitches remain. Work leg in stockinette until measures 10cm.
Work 2 x 2 rib for 8 - 10cm
Cast off loosely.
Repeat for Right leg.
WORKING ARMS
Place arm stitches back on needles for working in the round. You will now need to use your preferred method for small circumference knitting (dpns, magic loop etc).
Join in yarn at beginning of arm. Knit around to last stitch. Pick up 6 stitches along cast on edge, placing a marker after picking up 3. This marker will be the beginning of round marker. Knit 2 rows.
Next row - K1, K2TOG, K to 3 stitches before marker, SSK, K1.
Next row - K
Next row - K
Repeat these 3 rows until 28 stitches remain. Work arm until measures 12cm.
Work 2 x 2 rib for 5 cm.
cast off loosely.
Repeat for other arm.
BUTTON BANDS
Join in yarn at right edge of placket, pick up 6 stitches along cast on edge and place on scrap yarn.
Pick up stitches along right front edge - approximately 3 picked up stitches for every 4 rows. Ensure that amount of picked up stitches is divisable by 4. Work 6 rows of 2 x 2 rib. Cast off loosely
Transfer 6 placket stitches from scrap yarn to DPN.
With RS facing and beginning at neck of left front, pick up the same amount of stitches as for the right front.
Row 1 (WS) - Work 2 x 2 rib beginning with either p2 or k2, depending on which will ensure that your last 2 picked up stitches will be k2
Row 2 (RS) - work in 2 x 2 rib until last stitch, work last stitch and 1st stitch on dpn as a SSK
Row 3 (WS) - work next stitch on dpn and 1st stitch on button band as P2togTBL, P1, K2, K2TOG YO. Continue working button holes by K2tog YO, evenly across row to end, keeping rib pattern
Row 4 (RS) - work as per row 2
Row 5 (WS) - work next stitch on dpn and 1st stitch on button band as P2togTBL, P1, work 2 x 2 rib as set.
Row 6 (RS) - work as per row 2
Row 7 (WS) - work as per 5
Cast off.
NECK
Pick up stitches along top of button band and neckline to other button band. Work 6 − 8 rows of stockinette and then cast off loosely.
FINISHING
Sew down the bottom of the right button band to the placket.
Weave in all ends
Block
Sew on buttons
Dress baby in snuggly new romper suit.


 I’m so glad I have finished this just in time for our cold weather, it’s very warm and wonderful to snuggle under.
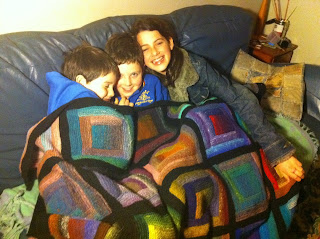


